jspa01 : Intro to JavaScript, React, Jest, and Codecov.io
| num | ready? | description | assigned MW lect | due MW lect | assigned TR lect | due TR lect |
|---|---|---|---|---|---|---|
| jspa01 | true | Intro to JavaScript, React, Jest, and Codecov.io | Mon 01/11 12:30PM | Wed 01/20 11:00PM |
jspa01
Learning goals
By the end of this lab, you should have been exposed to the following:
- Installing and running a React application.
- Setting up CodeCov on your repo.
- Learning the basics of JavaScript:
- How to throw an error.
- The difference between
===and==in JavaScript. - String interpolation with backticks and
${variable}. - How imports and exports work in JavaScript.
- The basics of how classes work in JavaScript.
thisin JavaScript and why it might differ fromthisandselfin other languages.- Arrow functions.
- De-structuring assignment and how it works.
- The spread operator.
- Learning the basics of testing in JavaScript:
- How to run tests in JavaScript.
- How to filter tests by file and title.
- How to read tests written in JavaScript.
- Learning the basics of React
- How react components are created.
- What React component tests look like.
- How the XML syntax of
.jsxfiles works.
Emphasis on expose. Learning JavaScript and React is a process and this is just to accustom you to some of the terms and concepts that we’re going to be working with.
If you haven’t looked through it already, this article by Mozilla serves as a good primer on JavaScript as well as touching on some of the topics above. We strongly recommend reading it through until the Closures heading to get a feel for the language.
Setting up your repo
- You should find that you have a repo with the name
jspa01-joegaucho, wherejoegauchois your GitHub id.- Note: replace
joegauchowith your actual GitHub username for all remaining steps!
- Note: replace
- Clone your repo: git clone git@github.com:ucsb-cs156-w21/jspa01-joegaucho.git
- Move into your repo’s directory:
cd jspa01-joegaucho - Change your base branch to
main:git checkout -b main - Add the starter code to your repo:
- git remote add starter git@github.com:ucsb-cs156-w21/STARTER-jspa01.git
- git pull starter main
- Push your repo (now with starter code) to GitHub:
git push origin main
Getting the app running
You can find the instructions for getting started in the README.md file in the root project folder, but you’ll find them restated below.
Always cd javascript before running any of these commands.
npm installinstalls the necessary packages intojavascript/node_modules. Note that thejavascript/node_modulesdirectory can be completely deleted and rebuilt at any time (deleting it is similar to amake cleanormvn cleancommand). It is normal fornpm installto take a while to run, particularly the first time you type it. You typically only need to type this when it’s a brand new project, or if/when you make changes to the filepackage.json, not every time you make a change in the code.npm startstarts up a web server on http://localhost:3000 where you can interact with a web page.- Some notes on
npm startappear below; the way you view the running web page will depend on whether you do the lab on CSIL or your own system, and how you connect to CSIL.
- Some notes on
npm testruns the unit tests for this project.
There should be 25 failing tests when you runnpm test; don’t worry, it’s supposed to be like that at the beginning.
Notes on npm start
First, note that on all systems, npm start can take a while to start up. Wait for a message like this one before trying
to connect in your web browser:
Compiled successfully!

You can now view intro-to-javascript in the browser.

  Local:            http://localhost:3000
If you’re working over SSH on CSIL (e.g. with PuTTY, MobaXTerm, or an ssh username@csil.cs.ucsb.edu at the command line,
the following notes may apply to you.
First, realize that npm start runs the app on CSIL, not your own computer. The address https://localhost:3000 only works
if your web browser is running on the same machine as the web server. If your browser is running on your own laptop or desktop,
but the web server is running on CSIL, then http://localhost:3000 will not work.
Here are your alternative options. Any of these should work; find the one that works best for you.
-
Type
hostnameat a prompt on the CSIL machine where you are running. The output will be something like this:[pconrad@csilvm-01 ~]$ hostname csilvm-01.cs.ucsb.edu [pconrad@csilvm-01 ~]$Use that string as your web address instead of
localhost, e.g. http://csilvm-01.cs.ucsb.edu:3000. You still need thehttp://and the:3000. -
Use port forwarding as described here.
The command you want would be something like this:
ssh -L 1234:localhost:3000 username@csil.cs.ucsb.eduThen, you can access the server from
localhost:3000on the remote machine by visiting http://localhost:1234 on your local machine. -
Use the Remote Desktop solution instead, described here: https://doc.engr.ucsb.edu/display/EPK/Remote+Access+to+Computer+Science+Computing+Labs
With this “Remote Desktop” solution, you use software that shows an entire Linux Desktop on the CSIL machines in a window on your local Windows, Mac or Linux machine. You’ll use a browser running on the CSIL vm, so that you can just access http://localhost:3000 and everything just works.
-
If the solutions above are too onerous, hard to figure out or slow, you always have the option to just install the needed software (in this case,
gitandnpm) on your local system. You can find instructions on that here:
Setting up CodeCov for your repo
Codecov.io is a commerical service that provides hosting for Code Coverage reports. We’ll get into what code coverage is in more detail later, but the short version is is that it’s a measure of how much of your code is covered by automated tests. You can learn more here: https://ucsb-cs156.github.io/topics/testing/
The first thing you’re going to want to do is Get the GitHub Student Developer Pack so that you have free access to CodeCov. To do so:
- Visit https://education.github.com/students
- Signing in with your GitHub account and provide them your
@ucsb.eduemail. - This should grant you the developer pack within 15 minutes; be patient with waiting for the email.
Once you’ve completed that, we’re now going to set up CodeCov for your project to track a testing metric called code coverage for your assignment.
You can follow the instructions found in README.md under the Setting up Code Coverage heading.
Once you log in, please message course staff to get your account activated.
If you want some guidance on how to approach the remainder of the lab, then read the rest of the instructions below.
Or, if you’re feeling adventurous then you can just dive into the app and start fixing the failing tests. The goal is to get all of the tests to pass, both here, and on Gradescope.
Fixing up the Rational Class
If you ran the tests before, you might notice that there are a lot of failing tests with an obnoxious amount of console output. First things first, we’re going to cut down the number of tests being run by adding a filter:
npm test -- Rational.test.js
The -- adds a filter to npm test that only runs test files that have a prefix that matches the following arguments. In this case, we want to focus on tests from Rational.test.js, so we used that. This narrows down the number of failing tests to 13, each with a much more manageable output.
- Note: we could also have used
Rational.testin place ofRational.test.js, as it does prefix matching on filenames, including the file’s path.
Our goal now is to fix all of the failing tests in src/test/rationals/Rational.test.js by editing src/main/rationals/Rational.js; no other file needs to be touched for this section.
- Note: each file being tested int
src/mainhas a matching test file insrc/test! The only difference is that implementation files end with only.jsor.jsxwhile their testing counterparts end with.test.jsor.test.jsx.
To reiterate: the first pair of files we’ll be focusing on are:
src/main/rationals/Rational.js- the implementation file we need to edit.src/test/rationals/Rational.test.js- the test file we don’t edit.
Here is a suggested order for resolving the test suites (by class function):
constructor
This may be your first time working with JavaScript, so we’re going to go into a lot of detail for this step.
Let’s take a look at the constructor method in the Rational class in src/main/rationals/Rational.js:
// 1
import  {  gcd,  lcm  }  from  "./Helpers";

// 2
export  default  class  Rational  {
  // 3
  constructor(numerator,  denominator)  {
    if (typeof  numerator  !==  "number"  ||  typeof  denominator  !==  "number") {
      throw  new  Error(`Incorrect types passed to Rational constructor; got ${typeof  numerator} and ${typeof  denominator}`);
    }
    // 4
    this.numerator =  Math.trunc(numerator);
    this.denominator =  Math.trunc(denominator);
		      // 5
    if (this.numerator !==  0) {
      const  greatestCommonDivisor  =  gcd(this.numerator,  this.denominator);
      this.numerator /=  greatestCommonDivisor;
      this.denominator /=  greatestCommonDivisor;
    }
    // 6
  }
  ...
}
Here’s the break down point by point:
- This is how you import code from other modules (JavaScript files); you can find a more detailed explanation here.
- While the
class Rationalmight look familiar,export defaultmight not. You can find a detailed explanation here, but the quick version is that this is how this class is able to beimport-ed in other files. - This is how you declare a constructor function in JavaScript; this function is called whenever you see
new Rational(...). - This is where we assign values to our instance variables on the
Rationalobject. Notice that you don’t need to declare these fields beforehand! In addition, while we usethisto refer to theRationalobject in this constructor, do remember that the behavior ofthiscan differ in other contexts, as described here. - Notice that the use of
!==instead of!=; the difference between the two is whether you allow for type coercion (i.e. allow"2"to be coerced to2). The same goes for===and==; you can read up more on this here. - Notice that we don’t return anything at the end of the constructor! Constructors in JavaScript only need to fill out the instance field values by assigning to
this.
Now that we understand what we’re looking at, let’s run the tests. Here’s the specific test command for only running tests related to this method:
npm test -- Rational.test.js -t constructor
The additional -t constructor tests the testing program to only include tests with the word constructor in their title. Running this, you should see 4 failing tests, with the following titles:
(2 pts) truncation triggers 0 denominator error(2 pts) resolves double negatives(2 pts) throws an error when denominator is 0(2 pts) pushes negative to numerator
In order to resolve these tests, it is extremely helpful to read through the output provided by the tests. That alone will often tell you exactly what the problem is.
Let’s walk through the first failing test: (2 pts) truncation triggers 0 denominator error
If we open up the test file (src/test/rationals/Rational.test.js) we should find the following:
// 1                          // 2
describe("constructor tests", () => {
    // 3                                                     // 4
    test("(2 pts) truncation triggers 0 denominator error",  ()  =>  {
     // 5   // 6                           // 7
    expect(()  =>  new Rational(1,  0.9)).toThrow();
  });
Let’s go ahead and break this down:
- This
describefunction is how you group tests and is commonly referred to as a “describeblock”. It takes the group name and the block of tests it runs. - The
() => {}notation is very similar tofunction() {}. You can see a list of differences here, but it is generally preferred to use() => {}for succinctness. In this case, we are declare a function that will contain all of the tests we want to run in this group. - This is how tests are declared.
testis a function that takes 2 arguments: the title of the test and the test to be run. - Once again, no need to fear
() => {}; we are just declaring the function that will be run as our test. expectserves as ourassertin this testing framework (which is Jest if you’re curious).- We are declaring a function here that immediately returns the result of
new Rational(1, 0.9). As a result, you don’t need{}or areturnstatement. expecthas many assertions you can make about whatever you pass into it. In this case, we passed a function that we expect to throw, and used thetoThrow()assertion. The full list of assertions can be found here.
With that syntax out of the way, let’s consider the constructor for a moment.
constructor(numerator,  denominator)  {
  if (typeof  numerator  !==  "number"  ||  typeof  denominator  !==  "number") {
    throw  new  Error(`Incorrect types passed to Rational constructor; got ${typeof  numerator} and ${typeof  denominator}`);
  }
  this.numerator =  Math.trunc(numerator);
  this.denominator =  Math.trunc(denominator);

  if (this.numerator !==  0) {
    const  greatestCommonDivisor  =  gcd(this.numerator,  this.denominator);
    this.numerator /=  greatestCommonDivisor;
    this.denominator /=  greatestCommonDivisor;
  }
}
One problem with this constructor at the moment is that it doesn’t check if the denominator is 0 and throw an Error if it is. One way to solve that might look like the following:
if (denominator === 0) {
  throw new Error("error message goes here");
}
this.numerator = Math.trunc(numerator);
this.denominator = Math.trunc(denominator);
That would ignore however, the fact that Math.trunc(0.9) ends up being 0! If instead we add this check:
this.numerator = Math.trunc(numerator);
this.denominator = Math.trunc(denominator);
if (this.denominator === 0) {
  throw new Error("error message goes here");
}
We may now notice that this passes 2 tests with one change! Let’s go ahead and commit/push your changes to GitHub using the commands below in your terminal:
# add files to be committed (this is called "staging" files)
git add .

# This creates a commit with the staged files
# Replace jg below with your intials and summarize the work done in this commit after the '-'!
git commit -m 'jg - added check for denominator being 0 in Rational constructor'

# This pushes the commits on your branch to origin's main branch; origin is GitHub in this case.
git push origin main
Only these constructor tests should remain:
(2 pts) resolves double negatives(2 pts) pushes negative to numerator
Go ahead and resolve these two tests, making sure to commit/push your work every time you fix another test as outlined above.
Having now walked you through this step, we’re going to expect you to be more independent for the remaining steps.
toString
Here’s the specific test command for only running tests related to this method:
npm test -- Rational.test.js -t toString
- You may find this article on string interpolation helpful. There is also an example of string interpolation in the first
Errorthrown in the constructor.
times + multiply
Here’s the specific test command for only running tests related to these methods:
npm test -- Rational.test.js -t times
minus + subtract
Here’s the specific test command for only running tests related to these methods:
npm test -- Rational.test.js -t minus
- This can be done in a single line if you leverage
timesormultiply.
reciprocal
Here’s the specific test command for only running tests related to this method:
npm test -- Rational.test.js -t reciprocal
dividedBy + quotient
Here’s the specific test command for only running tests related to these methods:
npm test -- Rational.test.js -t divide
You’ll be ready to move on from this step once you pass all of the tests when running npm test -- Rational.test.js. Once that’s the case, make sure your changes are committed and pushed to GitHub.
Fixing up the Rational Helpers
The next pair of files we’ll focusing on are:
src/main/utils/RationalHelpers.js- the implementation file we edit.src/test/utils/RationalHelpers.test.js- the test file we don’t edit.
The RationalHelpers.js file has a number of helper functions that take userInput (an array of inputs from the user) and invoke the Rational class to calculate the end result.
The filtered test command for this is npm test -- RationalHelpers.test.js; we should see 5 failing tests with this.
Here’s a suggested order for solving fixing the tests, grouped by function:
parseRationalsFromUserInput
Here’s the specific test command for only running tests related to this method:
npm test -- RationalHelpers.test.js -t parseRationalsFromUserInput
Here’s the goal of parseRationalsFromUserInput: it is to take in userInput, which is an array of values that each have a numerator and a denominator field, and translate that into an array of Rational’s. Let’s see a breakdown below:
// 1    				// 2
const parseRationalsFromUserInput = (userInput) => {
  // 3
  const rationals = userInput.map((value) => {
    const numerator = parseInt(value.numerator);
    const denominator = parseInt(value.denominator);
    return new Rational(numerator, denominator);
  });
  return rationals;
};
constis just a way of declaring an immutable variable. It’s also worth pointing out that functions can be assigned to variables, as is being done withparseRationalsFromUserInput. You can read more about different variable declarations in the primer article, under the Variables heading here.- This is another
() => {}(from here on will be referred to as an arrow function), but one that accepts an argument that will be referred to asuserInput. Note that there is no type information here; JavaScript is not a type checking nor a type safe language. We are assuming thatuserInputis an array though. You can read up on it here. .map(...)is a function on arrays that allows to pass a function that transforms a single element of the array, returning the new value it should have in the new array. In this case, the function being passed here is taking thevalueof the element and returning aRationalobject in it’s place. You can read up on it here.- Note:
.map(...)returns a new array and does not mutate the one on which.map(...)is called.
- Note:
If we look at the failing test in src/test/utils/RationalHelpers.js, we see that the inputs being passed to parseRationalsFromUserInput are not completely numeric:
test("(3 pts) parseRationalsFromUserInput throws an error when it parses an invalid input",  ()  =>  {
  const invalidUserInput = [
    {
      numerator: "",
      denominator: "",
    }
  ]
  ...
  const anotherInvalidUserInput = [
    {
      numerator: "1",
      denominator: "",
    }
  ]
  ...
}
In order to resolve this test, you might find isNaN() to be very helpful, as parseInt() produces NaN if it fails to parse a number.
multiplyRationalsFromUserInput
Here’s the specific test command for only running tests related to this method:
npm test -- RationalHelpers.test.js -t multiplyRationalsFromUserInput
In order to fix the broken test for this it would be good to look at what is happening in a related function, addRationalsFromUserInput:
const addRationalsFromUserInput = (userInput) => {
  // 1
  const [firstRational, secondRational] = parseRationalsFromUserInput(
    userInput
  );
  const result = Rational.sum(firstRational, secondRational);
  return result;
};
- This type of assignment is often referred to as de-structuring assignment, because you de-structure the value on the right hand side into the variables being declared on the left hand side. In this case, we are taking the first two elements of the result of
parseRationalsFromUserInputand assigning them toconstvariablesfirstRationalandsecondRational. You can read up on this here.- Note: you can do this with objects too! Follow the above link and scroll down a bit to see it.
With the fancy syntax out of the way, it should be clearer what the responsibility of this set of functions is:
- Parse out
RationalsfromuserInput. - Get the result by using the
Rationalmethods you just fixed. - Return the
Rationalresult.
Long story short: it is monkey see, monkey do to fix this function, along with the next two.
Don’t forget to commit and push your changes as you fix tests.
subtractRationalsFromUserInput
Here’s the specific test command for only running tests related to this method:
npm test -- RationalHelpers.test.js -t subtractRationalsFromUserInput
Fixing this should be similar to fixing multiplyRationalsFromUserInput.
Don’t forget to commit and push your changes as you fix tests.
divideRationalsFromUserInput
Here’s the specific test command for only running tests related to this method:
npm test -- RationalHelpers.test.js -t divideRationalsFromUserInput
Fixing this should be similar to fixing multiplyRationalsFromUserInput, except that there’s an additional error that needs to be thrown. Looking at the broken test should clarify when that error needs to be thrown.
Don’t forget to commit and push your changes as you fix tests.
You’re ready to move on from this step when running npm test -- RationalHelpers.test.js does not report any failing tests. On the other hand, running npm test and using a to run all tests should report 4 failing tests.
We’re almost there, and we’re moving onto React.
Adding links to the missing pages (and intro to React)
The next pair of files we’re going to focus on are:
src/main/components/AppNavbar.jsx- the file with the React component that we’re going to be editing.src/test/components/AppNavbar.test.jsx- the test file that we don’t edit.
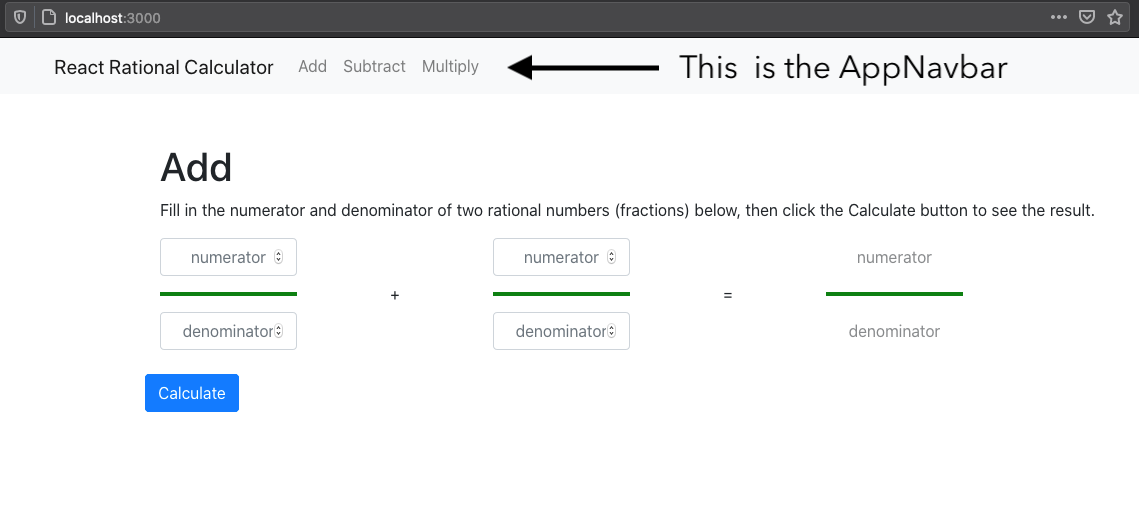
The goal of this React component is to manage the top navigation bar of the running application, which is pictured below:
A quick aside on .js vs .jsx
.js vs .jsxThere is generally no real difference between the two file types. That being said, .js is meant to denote pure JavaScript, while .jsx stands for JavaScript + XML. Files that feature React typically use .jsx because React components are built using an XML syntax ends up looking a lot like HTML. You can read up more on this topic here.
Now given that this may be your first foray into React, we’re also going to break down what you’re seeing in this component’s corresponding file: src/main/components/AppNavbar.jsx.
// 1
import React from "react";
import { Nav, Navbar } from "react-bootstrap";
import { LinkContainer } from "react-router-bootstrap";

// 2
const AppNavbar = () => {
  return (
    // 3
    <Navbar className="navbar-light bg-light mr-auto">
      <LinkContainer style= to="/">
        <Navbar.Brand>React Rational Calculator</Navbar.Brand>
      </LinkContainer>
      <Nav>
        <LinkContainer to="/add">
          <Nav.Link>Add</Nav.Link>
        </LinkContainer>
        <LinkContainer to="/subtract">
          <Nav.Link>Subtract</Nav.Link>
        </LinkContainer>
        <LinkContainer to="/multiply">
          <Nav.Link>Multiply</Nav.Link>
        </LinkContainer>
      </Nav>
    </Navbar>
  );
};
// 4
export default AppNavbar;
- The first thing you’ll see in every file that uses React is this
importstatement. This is also what allows for the XML syntax you see in the return value. There are a few other React components being imported here in order to create thisAppNavbar. - You can see here that the
AppNavbaris actually just a function; React components can either be written as functions (functional components) or classes (class components). While class components were used for much of React’s history, most developers agree that the future of React development should be done with pure components. You can read up on the differences here, but note that the article goes into more features than you’ll need to complete this lab. - Every React component’s goal is to return HTML to be rendered in the browser. It is worth noting that while we see
NavbarandNavXML tags here, those are not HTML tags. That is because they will be compiled down into their HTML during the build step, the same way a function call gets resolved before code is executed. - This is how
AppNavbaris exported from this module (aka file). You can read up on exports here.
Component tags (in more detail)
A helpful way to conceptualize these component tags is by treating each of them as a function call. For example, let’s look at one of the LinkContainers:
<LinkContainer to="/multiply">
  <Nav.Link>Multiply</Nav.Link>
</LinkContainer>
I would conceptualize this as follows:
LinkContainer({
  to: "multiply",
  children: Nav.Link("Multiply"),
});
The arguments being passed to the component are accessible via first argument of a functional component and the this.props field of a class component. You can see more examples here.
Let’s now take a look at the failing test:
import React from "react";
import { render } from "@testing-library/react";
import AppNavbar from "main/components/AppNavbar";
import { BrowserRouter } from "react-router-dom";

describe("AppNavbar tests", () => {

  ...

  test("(1 pts) should render a link to each page ", () => {
            // 2           // 1
    const { getByText } = render(
      // 3
      <BrowserRouter>
        <AppNavbar />
      </BrowserRouter>
    );

    const addLink = getByText("Add");
    const subtractLink = getByText("Subtract");
    const multiplyLink = getByText("Multiply");
    const divideLink = getByText("Divide"); // Test fails here
                    // 4
    expect(addLink).toBeInTheDocument();
    expect(subtractLink).toBeInTheDocument();
    expect(multiplyLink).toBeInTheDocument();
    expect(divideLink).toBeInTheDocument();
  });
});
- When testing react components, we need a way to
renderthem into a test browser of sorts (from now on referred to as the virtual DOM). Hence, we callrenderon the component that we wish to render, which is being provided by React Testing Library. You can read up more onrenderhere. - First things first: this is de-structuring assignment, but now with an object. The second thing is that
getByTextis a query that we can use to find text within the virtual DOM created byrender. In essence, if you have something like<div>Hello</div>, you can findHello. You can read up more ongetByTexthere. - This is how we render
AppNavbar. While other components can generally be rendered by themselves, our use ofLinkContainerrequires thatAppNavbarbe used in the context of aBrowserRouter. toBeInTheDocument()is a useful assertion used to verify that something is in the virtual DOM.
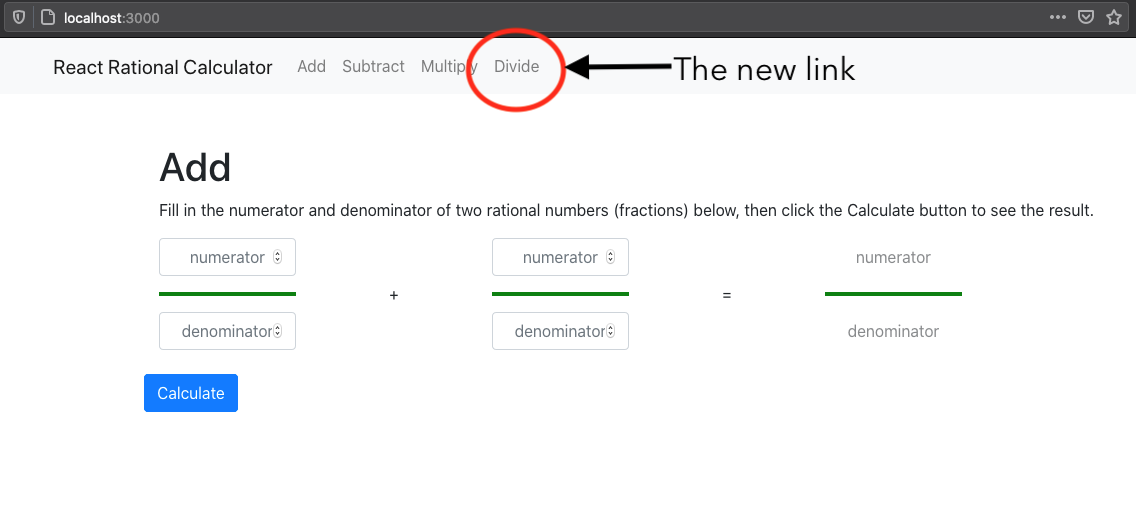
Given that the test seems to be failing on getByText("Divide"), we can surmise that we’re missing the text "Divide" in the document. We can verify this is true by referring back to the running application; there is no “Divide” text anywhere on the page.
Judging from that and the test’s name, our goal should be to add a link to the Divide page in the AppNavbar. We can do so with the following change in src/main/components/AppNavbar.jsx:
const AppNavbar = () => {
  return (
    <Navbar className="navbar-light bg-light mr-auto">
      <LinkContainer style= to="/">
        <Navbar.Brand>React Rational Calculator</Navbar.Brand>
      </LinkContainer>
      <Nav>
        <LinkContainer to="/add">
          <Nav.Link>Add</Nav.Link>
        </LinkContainer>
        <LinkContainer to="/subtract">
          <Nav.Link>Subtract</Nav.Link>
        </LinkContainer>
        <LinkContainer to="/multiply">
          <Nav.Link>Multiply</Nav.Link>
        </LinkContainer>

        {/* Our change: */}
        <LinkContainer to="/divide">
          <Nav.Link>Divide</Nav.Link>
        </LinkContainer>
      </Nav>
    </Navbar>
  );
};
You should now be passing all tests with npm test -- AppNavbar.test.jsx, as well as see a new link you can click on in the AppNavbar, as pictured below:
If you run all tests with npm test and using a to run all tests, you should now only have 3 failing tests. Don’t forget to commit and push your changes to GitHub; we’re now moving on to the final section!
Filling out the remaining pages
The remaining failing tests all deal with the fact that when you visit the localhost:3000/subtract, localhost:3000/multiply, and localhost:3000/divide pages, they all don’t have a calculator.
The good news is that we have a Calculator component we can use! Let’s take a look at src/main/pages/Add.jsx to get a better understanding of how to use it.
import React from "react";
import { addRationalsFromUserInput } from "main/utils/RationalHelpers";
import Calculator from "main/components/Calculator";

const Add = () => {
  const props = {
    calculateFromUserInput: addRationalsFromUserInput,
    title: "Add",
    subtitle:
      "Fill in the numerator and denominator of two rational numbers (fractions) below, then click the Calculate button to see the result.",
    sign: "+",
  };
  // 1
  return <Calculator {...props} />;
};

export default Add;
- This is an example of the spread operator, which assigns all of the fields of props to the matching fields with
Calculator. It is the same as:
<Calculator
  calculateFromUserInput={props.calculateFromUserInput}
  title={props.title}
  subtitle={props.subtitle}
  sign={props.sign}
/>
What’s the deal with tags and braces?
You might notice that there seems to be a mix of syntax all of a sudden; there’s <tags></tags> but now you have these strange braces (like {... props}) that seems to break into JavaScript?
The short answer is this: once you’re in XML, you can break into JavaScript by using braces, like { javascriptGoesHere() }. This is useful if you want to have a component show data that is tied to a variable, which you might do like this:
const Greeting = () => {
  const username = "World";
  return <h1>Hello, {username}!</h1>;
};
This would render the following:
Hello, World!
If you want to read up more on .jsx and how it works, you can read over this article here.
We can follow this into the Calculator component itself:
import React, { useState, useReducer } from "react";
import { Row, Col, Button, Alert } from "react-bootstrap";
import RationalInput from "main/components/RationalInput";
                      // 1
const Calculator = ({ calculateFromUserInput, title, subtitle, sign }) => {
  ...
};

export default Calculator;
- We can see the props being destructured here.
With that, let’s take a look at actually fixing the failing tests. If you want to read a full breakdown of the Calculator component, you can read one at the end of this lab.
Fixing the Subtract Page
Here’s the specific test command for only running tests related to this method:
npm test -- Subtract.test.jsx
Let’s first examine the failing test:
import React from "react";
import { render } from "@testing-library/react";
import userEvent from "@testing-library/user-event";
import Subtract from "main/pages/Subtract";

describe("Subtract tests", () => {
  ...

  // 1
  test("(5 pts) pressing the calculate button should subtract the two rationals", () => {
    // 2
    const { getAllByPlaceholderText, getByRole, getByText } = render(
      <Subtract />
    );

    const title = getByText("Subtract"); // The test fails here
    expect(title).toBeInTheDocument();

    const numeratorFields = getAllByPlaceholderText("numerator");
    const denominatorFields = getAllByPlaceholderText("denominator");
    // 3
    userEvent.type(numeratorFields[0], "1");
    userEvent.type(denominatorFields[0], "4");
    userEvent.type(numeratorFields[1], "3");
    userEvent.type(denominatorFields[1], "4");
    // 4
    const calculateButton = getByRole("button");
    userEvent.click(calculateButton);

    const resultNumeratorField = getAllByPlaceholderText("numerator")[2];
    const resultDenominatorField = getAllByPlaceholderText("denominator")[2];
    expect(resultNumeratorField.value).toEqual("-1");
    expect(resultDenominatorField.value).toEqual("2");
  });
});
- This test is focused on confirming that the user can submit two rationals to the page and then receive the correct answer back.
getAllByPlaceHolderTextandgetByRoleare two new examples of queries fromrender.getAllByPlaceholderTextis part of thegetAllBy*family, which will collect all nodes that match. On the other hand, queries likegetByRoleonly expect a single node to match and will fail if they encounter more than one. You can read up on the different types of queries here.userEventis a related testing library that allows us to emulate a user interacting with the DOM. In this case, we’re using the.type(...)function in order to type into the different fields.- We’re using
getByRolehere to retrieve the node with the button in it. Note that this is just one way to find the button on the DOM; we could have also used something likegetByText("Calculate")to find the button as well. You can read up more on the*ByRolequery type here.
The way we’re going to go about fixing this test is by making use of the Calculator component like we do in src/main/pages/Add.jsx. Here are the changes we’re going to make.
import React from "react";
// 1
import { subtractRationalsFromUserInput } from "main/utils/RationalHelpers";
import Calculator from "main/components/Calculator";

const Subtract = () => {
  // 2
  const props = {
    // 3
    calculateFromUserInput: subtractRationalsFromUserInput,
    title: "Subtract",
    subtitle:
      "Fill in the numerator and denominator of two rational numbers (fractions) below, then click the Calculate button to see the result.",
    sign: "-",
  };
  // 4
  return <Calculator {...props} />;
};

export default Subtract;
- We’re going to import the
subtractRationalsFromUserInputthat we fixed insrc/main/utils/RationalHelpers.js, as well as get theCalculatorcomponent inmain/components/Calculator.jsx. You can read up more on different import styles here and their corresponding export styles here. - We’re going to declare the props we need to pass to the
Calculatorcomponent here. We’re usingconsthere because the value is not expected to change. - We’re going to assign the different prop values we’re passing to
Calculatorhere. We need to passcalculateFromUserInput,title,subtitle, andsignin order to satisfyCalculator. - We’re going to create a
Calculatorcomponent and pass the props into it using the spread operator.
After making those changes, we should be able to see that the our test now passes. Don’t forget to commit and push your changes as you fix tests.
Fixing the Multiply Page
We’re no longer going to give you the command to test just this file, but we will tell you that the file name you want is Multiply.test.jsx. Can you create the npm test command yourself?
Resolving this test should be very similar to how you resolved the previous test for src/main/pages/Subtract.jsx.
Don’t forget to commit and push your changes as you fix tests.
Fixing the Divide Page
While we also want to make the same changes as we did in src/main/pages/Multiply.jsx but in src/main/pages/Divide.jsx, we still need to make one more change. Currently, if you click on the Divide item in Navbar that we added, it doesn’t go to the Divide page. In order to fix this, we need to visit src/main/App.jsx.
In src/main/App.jsx, we should see the following:
import React from "react";
import "main/App.css";
import Add from "main/pages/Add";
import Subtract from "main/pages/Subtract";
import Multiply from "main/pages/Multiply";
import { Container } from "react-bootstrap";
import { Route, Switch } from "react-router-dom";
import AppNavbar from "main/components/AppNavbar";
import AppFooter from "main/components/AppFooter";

function App() {
  return (
    <div className="App">
      <AppNavbar />
      <Container className="flex-grow-1 mt-5">
        <Switch>
          <Route exact path="/" component={Add} />
          <Route exact path="/add" component={Add} />
          <Route exact path="/subtract" component={Subtract} />
          <Route exact path="/multiply" component={Multiply} />
        </Switch>
      </Container>
      <AppFooter />
    </div>
  );
}

export default App;
The change we need to make? Create a new Route component like so: <Route exact path"/divide" component={Divide} />, for which we’ll need to import Divide from "main/pages/Divide" at the top of the file. After this change, clicking on the Divide item in the Navbar should now bring us to a working division calculator.
Don’t forget to commit and push your changes as you fix tests.
Finishing up
You’re ready to submit your lab if the following are true:
- Running all tests with
npm testpasses all 60 tests. - When you visit your repository on GitHub, you have a green checkmark next to your repo name (as pictured below).
- When you visit your repository on CodeCov, it has 100% code coverage.
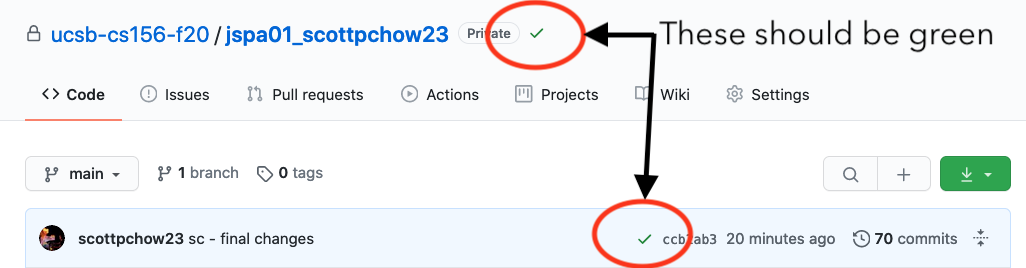
If all of those are true, then you can submit your project to GradeScope.
Another way to look at Code Coverage
One way to see code coverage information for your JavaScript code is via the reports on the Codecov.io website.
But there is another way to see them that does not require you to have codecov configured.
We do want everyone to learn how to configure and use codecov.io as part of this assignment; you’ll need that information and those skills later in the course.
However, if codecov.io isn’t working for you yet, that shouldn’t be a barrier to you being able to complete the entire assignment and get full credit for it.
Here’s how: recall that in jpa01, the first Java lab where we introduced code coverage, you
were able to run npm test jacoco:report and then open a file called target/site/jacoco/index.html.
For Jest testing with JavaScript, you can do something similar.
- Make sure you have done the command to make the
javascriptdirectory your current working directory, i.e. from the top level of the repo, usecd javascript. - Run the command
npm test. You may have to press theakey to “run all tests”. Be sure that all tests are passing, otherwise, you cannot get meaningful results for test coverage. - Run the command
npm run coverage -
Open the file
javascript/coverage/lcov-report/index.html(If you are working on CSIL, we suggest mounting your home directory with Samba so that you can navigate to the
javascript/coverage/lcov-report/index.htmlfile from your computer, and double click on it to open it.
Bonus
The Calculator component
Breaking down the Calculator component
If you’re deciding to read this, we’d recommend that you first finish the lab. This is going to get into the details of React and how functional components work.
Before we get into the nitty gritty of the Calculator component however, it’s worth understanding what the goal of this component is.
The goal of the Calculator component is to display and manage a rational calculator. It is responsible for the following:
- Calling the provided
calculateFromUserInputmethod when theCalculatebutton is pressed and passing the method the values in the fields. - Displaying the provided
title,subtitle, andsignin the appropriate locations.
Imports and method signature
With the big picture out of the way, we’re now going to focus on the code chunk by chunk.
// 1
import React, { useState, useReducer } from "react";
import { Row, Col, Button, Alert } from "react-bootstrap";
import RationalInput from "main/components/RationalInput";

// 2
const Calculator = ({ calculateFromUserInput, title, subtitle, sign }) => {
  ...
};

export default Calculator;
- We’re
importing more than just the usual React here; we’re adding some React Hooks here which areuseStateanduseReducer. React Hooks are the way we allow for our components to maintain state in our components as React re-renders our components. We’ll get into how these two functions behave in the next section. - You may notice that this component’s function is accepting arguments. Component arguments (more often called
props) is how data is communicated between parent components an their children. We are also making use of destructuring assignment in the first argument parameter to clean up code that would otherwise look like this:
// Without de-structuring, you'd need to append the argument name to the beginning of each value.
const Calculator = (props) => {
  // props.calculateFromUserInput
  // props.title
  // props.subtitle
  // props.sign
  ...
};
Everything before the return statement
We’ll now dig into the first half of the internals:
const Calculator = ({ calculateFromUserInput, title, subtitle, sign }) => {
  // 1
  const [result, setResult] = useState({
    numerator: "",
    denominator: "",
  });
  const [error, setError] = useState(null);
  // 2
  const [userInput, setUserInput] = useReducer(
    (state, { index, fieldName, value }) => {
      let newState = [...state];
      newState[index][fieldName] = value;
      // Return the current state updated with the new values in newState
      return newState;
    },
    [
      {
        numerator: "",
        denominator: "",
      },
      {
        numerator: "",
        denominator: "",
      },
    ]
  );
  // 3
  const handleChange = (index, fieldName, value) => {
    setUserInput({ index, fieldName, value });
  };
  // 4
  const handleSubmit = (event) => {
    event.preventDefault();
    try {
      const result = calculateFromUserInput(userInput);
      setResult(result);
      setError(null);
    } catch (err) {
      setError(err);
    }
  };

  return (...);
};
- This is our first encounter with the
useStatehook. In this case, we’re remembering the value of the answer to the last calculation that our calculator performed, beginning with thenumeratoranddenominatorbeing blank. You should read up on how it works in the React documentation here. - Here we’re using a more complex hook
useReducerto manage the state of the form inCalculator. You can read the docs on it here if you’re interested in how it works. - The
handleChangefunction is responsible for correctly callingsetUserInput, which is the update function tied to ouruseReducerthat is managing form state. - The
handleSubmitfunction is responsible for handling the form submission event. It usesevent.preventDefault()to prevent the page from reloading (the “default” behavior). It then passesuserInput, the state managed byuseReducer, tocalculateFromUserInputand retrieves the result. If everything goes well, it updates the result and removes any error that may have previously been present. If an error is thrown, it updates the error state.
The return statement
Finally, we’ll look over the return statement:
const Calculator = ({ calculateFromUserInput, title, subtitle, sign }) => {
  ...
  return (
    {/* 1 */}
    <div data-testid="calculator">
      {/* 2 */}
      <h1>{title}</h1>
      <p>{subtitle}</p>
      {/* 3 */}
      {error && <Alert variant="danger">{error.message}</Alert>}
      {/* 4 */}
      <form onSubmit={handleSubmit}>
        <Row style=>
          <Col>
            {/* 5 */}
            <RationalInput
              index={0}
              handleChange={handleChange}
              value={userInput[0]}
            />
          </Col>
          ...
        </Row>
        <br />
        <Row>
          {/* 6 */}
          <Button type="submit">Calculate</Button>
        </Row>
      </form>
    </div>
  );
};
- If you’re curious about this
data-testidvalue, it’s purpose is to appear on the div for testing purposes (hence thetestidpart). This allows for React Testing Library to find this component withgetByTestId("calculator"). - This is an example of how we’re using
titleandsubtitleas content. Note the use of{ ... }to break into JavaScript. - If you haven’t seen this use of
&&before, it means the right hand side doesn’t run unless the left hand side is truthy. In this case, if there is noerror, don’t render an<Alert>. - This
formcomponent is the primary driver for this component. You’ll notice that this is where we make use of ourhandleSubmitfunction. - The
RationalInputcomponent is the component that manages each individual Rational input (the numerator / denominator components in the calculator). You can see here that we’re providing it some of the information it needs to invokehandleChangecorrectly by providing it anindexand what it is supposed to display viavalue. - The form submits when this button is clicked due to the
typeparameter on this button being set tosubmit. Having a button with this property in any<form>will cause that button to submit the form on click, with no addtional setup required.
And that’s it!
If that felt like WAY too much information, don’t worry; there is a reason this is in the bonus section instead of the main lab. We’ll be learning some of these more advanced concepts in labs to come.