jpa01 : Testing: test coverage and mutation testing
| num | ready? | description | assigned MW lect | due MW lect | assigned TR lect | due TR lect |
|---|---|---|---|---|---|---|
| jpa01 | true | Testing: test coverage and mutation testing | Mon 03/29 12:30PM | Fri 04/09 11:00PM |
This assignment is jpa01, i.e “Java Programming Assignment 01”.
If you find typos or problems with the lab instructions, please report them on the #typos channel on Slack
In this lab:
- using packages
- writing your own JUnit tests
- test coverage using Jacoco
- publishing test coverage using Codecov
- mutation testing with pitest
Working in a pair?
You have the option to work in a pair on this assignment.
To set up a pair repo, see these instructions: Pair Repo Setup.
In addition:
- Read about Strong Style Pairing and consider trying it.
- If you are working in aSwitch navigator/driver frequently and tradeoff who commits
If you are in your repo directory, and type git log at the command
line, you’ll see a list of the commits for your repo.
Record that you are pairing on each commit message by putting the initials of the pair partners at the start of the commit message.
E.g. If Selena Gomez is driving, and Justin Timberlake is
navigating, and you fixed a bug in your getDanceMoves() method, your
commit message should be SG/JT fixed bug in getDanceMoves()
We should see frequent switches between SG/JT and JT/SG.
When remote pairing, this means switching who is sharing their screen:
- The person driving pushes the repo.
- You switch who is sharing the screen
- Then, the other person pulls from the repo.
Step-by-Step
Step 0: Set up your repo
When cloning your repo, be sure to use only the ssh links.
- Using the
httpslink may result in an error when you try to push the to the repo, indicating that “a GitHub Action cannot be accessed from an OAuth login” or something like that. - Using ssh instead of https gets around this problem.
You may work individually or as a pair on this lab. However, if you work as a pair, please:
- Pair with someone from your same team, or at least, from your same discussion section.
- Remember to name the repo correctly, and also to add your pair on Gradescope each time you submit
The starter code is in https://github.com/ucsb-cs156-s21/STARTER-jpa01. Visit that page for the approrpiate URL to add the starter remote.
To add the starter as a remote, cd into the repo you cloned, then do:
git remote add starter https://github.com/ucsb-cs156-s21/STARTER-jpa01
Then do:
git checkout -b main
git pull starter main
git push origin main
That should get you set up with the starter code.
Step 1: Get oriented to packages
A few things to notice:
- Under
src, there are two directory trees:src/main/java/edu/ucsb/cs56/pconrad/menuitemscontains regular Java classes.src/test/java/edu/ucsb/cs56/pconrad/menuitemscontains the test classes.
Don’t change the package from pconrad to your name; the Gradescope autograder is looking for the code under the edu.ucsb.cs56.pconrad.menuitems package.
So each source file:
- must be under that directory path when it is compiled, and
- must have
package edu.ucsb.cs56.pconrad.menuitems;as the first line in the file
Here are the commands you’ll need as you work with the code. Try them out now.
| To do this | Type this command | Notes |
|---|---|---|
| compile the code | mvn compile |
|
| reset everything | mvn clean |
|
| run the tests | mvn test |
|
| generate a report of test coverage | mvn test jacoco:report |
Open the file target/site/jacoco/index.html in a browser to read the report |
| generate a jar file | mvn package |
|
| generate a mutation test report | mvn test org.pitest:pitest-maven:mutationCoverage |
Open the file target/pit-reports/yyyymmddhhmm/index.html to see the report; note that yyyymmddhhmm will be replaced by a date/timestamp. |
Step 2: Start writing code to make tests pass
In this lab, you’ll be implementing several methods of a class called MenuItem that represents
item on a restaurant Menu.
(There is a follow up lab in which we will add a Menu class that uses these menu items; but
we need to discuss sorting, java.lang.Comparable, java.util.Comparator,
and Java lambda expressions in lecture first before we get to that.)
A MenuItem represents an item on the menu of a restaurant. It has three attributes:
- the menu item name, e.g.
"Small Poke Bowl" - the price, in cents (e.g an item that costs $1.49 is represented by the integer 149)
- a category such as
"Beverages"or"Poke Bowls"
Note that the starter code:
- Has stubs for SOME of the needed methods, but NOT ALL of them
- Has unit tests for SOME of the needed methods, but NOT ALL of them
YOU WILL NEED TO WRITE SOME OF YOUR OWN TESTS.
So you’ll need to do a bit more work than you may be used to.
I suggest that you work in this order:
- First, Add stubs for all of the methods that don’t have them yet.
- Until you do this, you won’t be able to run any of the instructor unit tests on Gradescope.
- The reasons is that the instructor tests won’t compile against your code unless and until you have those methods.
- Then, try submitting on Gradescope
- At this point, you should have a clean compile for both the student and instructor code, though you won’t be passing most of the unit tests.
- Then, one at a time, work on each method
- If the method doesn’t have a unit test yet, write the test first and see it fail.
- Then make the test pass.
- Then submit on Gradescope and see if the test for that method passes on Gradescope
- Continue until all of your methods work.
Let me say this again, because I’ve assigned this lab a few times now, and each time, students fail to read this important instruction:
YOU MUST WRITE STUBS FOR ALL METHODS before any of the Gradescope tests will work. Until you write stubs for all methods, the code will FAIL TO COMPILE on Gradescope, and no tests will pass.
Details about methods of MenuItem
The constructor has the signature:
public MenuItem(String name,
                int priceInCents,
                String category)
Here are the instance methods you’ll need to implement for MenuItem
| Modifier and Type | Method | Description |
|---|---|---|
String |
getCategory() |
Returns the category of the menu item |
String |
getName() |
Returns the name of the menu item |
String |
getPrice() |
Returns the price, formatted as a string with a $. |
String |
getPrice(int width) |
Returns the price, formatted as a string with a $, right justified in a field with the specified width. |
int |
getPriceInCents() |
get the price in cents only |
String |
toString() |
return a string in csv format, in the order name,price,cateogry. For example: "Small Poke Bowl,1049,Poke Bowls"In this case, the price is unformatted; just an integer number of cents. |
Checking the tests
To check the code against the tests that you’ve written, use:
mvn test
Interpreting the output can be
Step 3: Learning about Test Coverage
Now, did you really write unit tests for all of your code? Let’s check!
We can automatically compute “test case coverage”, using a tool call JaCoCo (Java Code Coverage).
Read these short articles about test coverage before moving to step 4:
- https://ucsb-cs56.github.io/topics/testing/
- https://ucsb-cs56.github.io/topics/testing_jacoco_reports/
Once you’ve looked over those, it’s time to check your test coverage, which we’ll do in Step 4.
Step 4: Checking Test Case Coverage
Be sure that you’ve added your pair partner to your submissions on Gauchospace
Then, check your test coverage!
There are two ways to do it: locally, or using codecov. Use whichever way is eeasier for you.
Checking Test Case Coverage Locally.
- Run:
mvn test jacoco:report - Then, open the file
target/site/jacoco/index.htmlin a browser.
How you go about that depends a lot on your setup.
- On CSIL, we suggest mounting your home directory with Samba so that you can navigate to the
target/site/jacoco/index.htmlfile from your computer, and double click on it to open it. - Instructions for that are here for Windows and MacOS
Setting up CodeCov for your repo
A second way to check your code coverage involves using a commerical tool called Codecov.
The first time you use Codecov, there is some setup involved, and the staff has to manually enable the account for each student.
Therefore, some patience will be needed as we work through that process.
Codecov.io is a commerical service that provides hosting for Code Coverage reports. We’ll get into what code coverage is in more detail later, but the short version is is that it’s a measure of how much of your code is covered by automated tests. You can learn more here: https://ucsb-cs156.github.io/topics/testing/
The first thing you’re going to want to do is Get the GitHub Student Developer Pack so that you have free access to CodeCov. To do so:
- Visit https://education.github.com/students
- Signing in with your GitHub account and provide them your
@ucsb.eduemail. - This should grant you the developer pack within 15 minutes; be patient with waiting for the email.
Once you’ve completed that, we’re now going to set up CodeCov for your project to track a testing metric called code coverage for your assignment.
You can follow the instructions found in README.md under the Setting up Code Coverage heading.
Once you log in, please message course staff to get your account activated.
Please use the channel #help-codecov for these requests.
Checking Test Case Coverage via Codecov
If your main branch shows green (i.e. all tests pass), then you should be able to see the code coverage on Codecov.io by visiting
If your code is on another branch
How to read the test coverage reports
- If any line of code is red, that means it is not tested at all—it is being missed by line coverage
- If a line of code is yellow, it means there are multiple ways to execute the line.
- it may have an if/else, or a boolean expression involving
&&or||, and thus there are multiple paths through the code (multiple branches). - Yellow means it is being missed by branch coverage; some branches are covered, and others are not.
- Think about the multiple paths through the code and be sure your tests are coverage all of them.
- it may have an if/else, or a boolean expression involving
Step 5: Try to get as close to 100% coverage as you can
Keep reworking your code until you get as close as you can to 100% test coverage.
As we’ll discuss in lecture, 100% coverage isn’t always necessary or even desirable, but in this case you should be able to get there, or at least pretty close.
Try to get as close to 100% test coverage as you can. Then, once you’ve gotten to 100%, we’ll check the quality of your tests with an even more rigorous method, called “mutation testing”.
What is mutation testing?
Here is an explanation of mutation testing from the website for pitest which is the package we are using for mutation testing.
Explanation of Mutation Testing (click the arrow to reveal)
What is mutation testing?
How it works in 51 words
Mutation testing is conceptually quite simple.
Faults (or mutations) are automatically seeded into your code, then your tests are run. If your tests fail then the mutation is killed, if your tests pass then the mutation lived.
The quality of your tests can be gauged from the percentage of mutations killed.
What?
Really it is quite simple
To put it another way - PIT runs your unit tests against automatically modified versions of your application code. When the application code changes, it should produce different results and cause the unit tests to fail. If a unit test does not fail in this situation, it may indicate an issue with the test suite.
Why?
What’s wrong with line coverage?
Traditional test coverage (i.e line, statement, branch, etc.) measures only which code is executed by your tests. It does not check that your tests are actually able to detect faults in the executed code. It is therefore only able to identify code that is definitely not tested.
The most extreme examples of the problem are tests with no assertions. Fortunately these are uncommon in most code bases. Much more common is code that is only partially tested by its suite. A suite that only partially tests code can still execute all its branches (examples).
As it is actually able to detect whether each statement is meaningfully tested, mutation testing is the gold standard against which all other types of coverage are measured.
So, to clarify, you will run mutation testing once you’ve gotten to 100% line/branch coverage, or as close to it as you can get. At that point, you run:
mvn test org.pitest:pitest-maven:mutationCoverage
(Yeah, no one is going to expect you to memorize that command.
We might expect you to know mvn compile, mvn package, and mvn test, and maybe even mvn test jacoco:report, but not this one.)
When you run that command, your file MenuItem.java will be mutated; the pitest software will create mutant versions of that code in an attempt to deliberately introduce bugs. A mutant is killed when your test suite finds the bug. It survives when your test suite doesn’t kill the bug.
The output will show you how many mutants are killed.
You can see more detailed output by using a web browser to open up the file:
- target/pit-reports/yyyymmddhhmm/index.html
Note that yyyymmddhhmm will be replaced by a date/timestamp; each time you run the Maven command to run pitest, it will produce a new version of the report with a new timestamp.
It may be convenient to use mvn clean before running a pitest mutation report; that way there will only be one such directory rather than multiple ones.
Another way to see the Pitest report: GitHub Actions artifacts
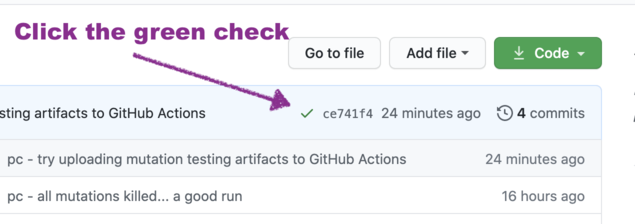
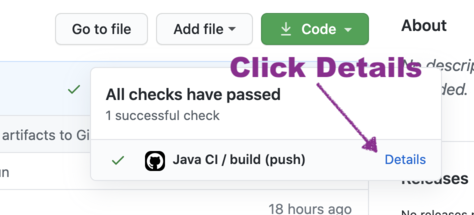
Another way to see the pitest report is to let the GitHub Actions run for your repo (which happens each time you push a change to GitHub). When you do, you should see that there is a link for “Artifacts” when you examine the Github Actions results.
Note: If you don’t see the Artifacts as shown below, click the arrow for hints on what might be wrong.
First, you must be passing all of the regular JUnit tests, or you won’t get a mutation testing report from pitest.
So check that you are passing all of the regular JUnit tests first.
Second, there is a chance that you picked up an old version of the starter code—and to be clear, you didn’t necessarily do anything wrong;
the first version of the instructions had master instead of main, and that branch didn’t have everything in it.
To check, compare your .github/workflows/maven.yml file with the listing of the file here: .github/workflows/maven.yml from starter code
Specifically, make sure the files ends with these lines, indented so that all of the - name commands line up (just like in the starter code at the link above)”:
      - name: Pitest
        run: mvn test org.pitest:pitest-maven:mutationCoverage
      - name: Upload Pitest to Artifacts
        uses: actions/upload-artifact@v2
        with:
          name: pitest-mutation-testing
          path: target/pit-reports/**/*
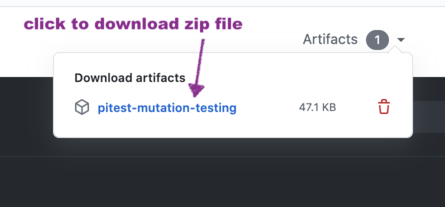
If you download the artifacts, you’ll get a .zip file that you can download, and
open. Inside that zip file, you’ll find an index.html file that you can open in a
web browser. That will show you the Pitest mutation report.

Mutation testing is 30% of your grade
30% of your grade for this lab will come from the number of mutants you kill. Kill 100% of the mutants, you get 30/30. Kill only half of them, you get 15/30.
Gradescope will run the mutation testing on your solution, and award points proportionately depending on how many you kill.
Now: since the mutants are based on your your individual solution, it is impossible to know in advance how many there will be, or what they will be. But you can investigate by looking at the report.
Step 6: Before final submission on Gradescope
The assignment on Gradescope is here: https://www.gradescope.com/courses/255328/assignments/1107943.
If working in a pair:
- Make sure that your README.md file has your github id(s) and name(s)
- Make sure that both of your names are attached to your Gradescope submission.