jpa00 : Getting Started
| num | ready? | description | assigned MW lect | due MW lect | assigned TR lect | due TR lect |
|---|---|---|---|---|---|---|
| jpa00 | true | Getting Started | Mon 03/29 12:30PM | Fri 04/02 11:59PM |
This assignment is jpa00, i.e “Java Programming Assignment 00”.
If you find typos or problems with the lab instructions, please report them on the #typos channel on Slack
Goals
This lab checks that you can succesfully edit, compile, run and submit a simple
Hello.java to Gradescope for grading.
You can do this lab from your own system if you have Java 11 and Maven installed. Eventually, you’ll probably find it helpful to install Java 11 and Maven on your own machine (i.e. your own Windows, Mac or Linux machine). However, it’s likely easier to just go ahead and do this lab directly on CSIL.
Do I really need Java 11?
You may be wondering whether it’s ok if you have Java 15 or Java 8, or some other version of Java instead of Java 11. This short answer is: for this simple Hello lab, it probably won’t make a difference, but eventually it probably will. So if you are going to the trouble of installing Java on your system, try to make sure it’s Java 11, specifically, which, unlike Java 12, 13, 14 or 15, it considered a Long-Term Support release of Java.
Read more here if you are interested: https://ucsb-cs156.github.io/topics/java_versions/
Something for everyone to learn
Note that even if you have done Java programming before, there
may be a few things about this Hello.java program that may be
unfamiliar to you. These have to do with setting us up for real world
programming practices used in large software projects.
- Rather than compiling with command line tools such as
javacand running the program with thejavacommand, we’ll be using a package and build manager called Maven. For a smallHello Worldtype program, this will seem like overkill; but it will set us up for being able to manage much larger projects. - We are setting our code up in a GitHub repo right from the start.
- We are going to be following the directory conventions required by Maven. So it’s important to have the correct directory structure within the GitHub repo.
There a few details, but they are all straightforward. It shouldn’t take very long, and if it goes well, you’ll be able to start on the next lab right away.
That one may actually take quite a bit more work.
Step 0: Getting oriented
Even if you’ve used CSIL before, there continue to be ongoing changes to how we interact with CSIL. So please read this carefully.
-
You should have a College of Engineering (CSIL) Account. If you don’t, you can create one by visiting https://accounts.engr.ucsb.edu
If this is your first Computer Science course at UCSB, you’ll definitely need to do that.
-
Once you have a CSIL account, please know that the way of remotely logging in to CSIL changed in Fall 2020.
Before Fall 2020, you were asked to not use
csil.cs.ucsb.edu, but instead to usecsil-01.cs.ucsb.edu,csil-01.cs.ucsb.edu, etc.THE OPPOSITE IS NOW TRUE.
Going forward, until told otherwise please use only
csil.cs.ucsb.edu, and do not usecsil-01.cs.ucsb.edu,csil-02.cs.ucsb.edu, etc.As far as how to login, we’ll cover that in in the next item.
-
If you’ve ssh’d to
csil.cs.ucsb.edubefore, but haven’t logged into that site recently (i.e. since Summer 2020), you might find that you get an error message when trying to login due to stale values in a file ion your system calledknown_hosts. The old entry in that file forcsil.cs.ucsb.eduwill need to be deleted, since thehostidvalue has changed over the summer.Otherwise, any time you connect to
csil.cs.ucsb.edu, the connection may be immediately closed.The exact location of this file may be different on different systems, but its likely in a directory called
.sshunder your home directory. Keep in mind that.sshmay be a hidden file.So the command you need might be something like this:
vim ~/.ssh/known_hoststo edit the file and remove the line forcsil.cs.ucsb.eduemacs ~/.ssh/known_hostsif you prefer that editorrm ~/.ssh/known_hostsif you just want to delete the file completely.
Deleting that file will just mean that the first time you connect to any particular system, you’ll be asked whether you really want to connect to that system, and store it’s identifying information in your
known_hostsfile, and you’ll have to respondyes. -
If you already have used an SSH client before, you can continue using that same client, but specify
csil.cs.ucsb.eduas the hostname.If you haven’t used an ssh client before, consult these pages for hints:
- Windows: https://ucsb-cs156.github.io/topics/csil_via_ssh_from_windows/
- MacOS: https://ucsb-cs156.github.io/topics/csil_via_ssh_from_macos/
- ECI’s article with guides for Windows, Mac and Linux: https://doc.engr.ucsb.edu/pages/viewpage.action?pageId=5112076
There are also channels on the course slack, https://ucsb-cs156-s21.slack.com, for
#help-windowsand#help-macos. Use the#help-otherif you need help for a system other than Windows or Mac (e.g. Linux, Chromebook, etc.) -
Ideally, you will already know the following things from previous courses (CMPSC 16, 24, 32). It is possible that if you are joining UCSB for the first time in this course, some of this may be unfamiliar to you. The rest of these instructions will assume you know how to do the items in the list below. If not, then let a member of the course staff know, and we’ll point you to resources where you can come up to speed.
- knowing how to use a basic text editor such as emacs or vim to edit files. (Here, for example, is some basic instruction on vim )
- knowing basic Unix/Linux
commands to create directories, change directory, manipulate files, i.e. commands such as:
mkdir,cd,pwd,mv,rm,ls. If those topics are new to you, please reach out to the instructor to let them know, and ask for pointers to resources where you can study up on these skills.
-
We strongly encourage the use of VSCode as an editor this course. For this assignment, it will not matter what editor you use, but in future assignments, the use of an IDE will become more important. We’ll discuss this more in lecture.
The rest of the lab: Step-by-Step
Step 1: Create a CoE account if you don’t have one already
For this first assignment, we’ll encourage you to login to the machines in the to the machines in the Computer Science labs, or to connect remotely, and do the assignment on CSIL.
Later in the course, for a variety of reasons, if you have your own laptop, it may be more effective to do your work there. We’ll try to always offer an option to work on the CSIL machines though, and we’d like everyone to start there so that we all have a common platform we can share.
To do this you will need a College of Engineering account. You can create an account online at https://accounts.engr.ucsb.edu/create if you don’t already have one.
If you are enrolled in any CoE course this quarter (including CS56), you should be able to create your account immediately.
If you are not able to do so, you will need to contact the ECI Help Desk at help@engineering.ucsb.edu.
Step 2: Get setup with github and add yourself to our organization
We will be using github.com in this course. We have created an organization called on github.com where you can create repositories (repos) for your assignments in this course.
The advantage of creating private repos under this organization is that the course staff (your instructors and TAs) will be able to see your code and provide you with help, without you having to do anything special.
To join this organization, you need to do three things.
-
If you don’t already have a github.com account, create one on the “free” plan. Visit https://github.com/
-
If you don’t already have your
@ucsb.eduemail address associated with your github.com account. go to “settings”, add that email, and confirm that email address. (If you have an@umail.ucsb.eduaddress registered there, that also works.) -
Visit our Github Sign Up Tool at https://ucsb-cs-github-linker.herokuapp.com/. Navigate to https://ucsb-cs-github-linker.herokuapp.com/. Login with your github.com account. Click “Home”, find this course (CS156, S21), and click the “Join course button”. That will automatically send you an invitation to join the course organization on github.
-
There should be a link to the invitation for the GitHub organization for this course (https://github.com/). Click on the invitation link and accept it. You can also go straight to https://github.com/ and see the invitation there (if you’re logged in). Accept the invitation that appears in your browser (from step 3) or log into your account on https://github.com/ to accept the invitation.
Step 3: Get setup with gradescope
We will use gradescope to grade all your homeworks, exams and lab/programming assignments. I have manually added everyone (using your @umail.ucsb.edu accounts) currently enrolled in the course to the Gradescope system. You should have received an email notification with instructions about logging into gradescope. Once you follow the instructions to set your password, you should have access to our course on Gradescope. You should see CS156 in your S21 courses.
The lab assignment jpa00 should appear in your Gradescope dashboard in CS156. You will need to submit your code for jpa00 using this page.
Step 4 (Optional): Set up your local system
We encourage you to skip this step for now, and just do the lab on CSIL.
-
You’ll likely be able to get through it faster, and ensure that you get a grade of 100%.
-
After that you can return to this step, and try doing the relevant parts of the lab again on your own system to ensure that everything is working.
But if you really, really want to do it on your own machine instead of CSIL, you can. Here’s what you’ll need to have installed:
- git
- Java 11 JDK
- Maven
There are instructions here for various platforms. These include instructions for the Heroku CLI; you’ll need that later in the quarter, but not for this assignment.
If you are running your own Linux box, you likely already know how to install software for your platform.
Note that the reference platform for the course remains “CSIL”; we cannot commit to being “tech support” for every conceivable platform. On your own machine, you are your own tech support. But we’ll help as best we can, given the time constraints we are under.
The remainder of the instructions mostly assume you are working on CSIL; you can likely adapt these for your own platform as needed.
Step 5: Configure your CSIL account for git/GitHub
In this step, we’ll configure your CSIL account for git and GitHub.
(If you are doing this lab on your own system, you may still need to do this step, but at a command prompt on your computer.)
We want to be able to use git and GitHub with ssh links, so we need to set up public-key/private-key pairs.
We also want to set up git so that it records our commits properly.
-
gitconfiguration: Detailed Instructions - Configure your CSIL account’s ssh keys for git
- Detailed instructions: Configuring your ssh key for Github.com
- If you are brand new to git and github, review a few basic facts about git and github.com
- detailed information here
Step 6: Finding your jpa00 repo on GitHub
Open a web browser and login to GitHub, then navigate to the course organization page, https://github.com/ucsb-cs156-s21.
You should see that there is a private repo in this organization called jpa00-yourGithubId, where yourGithubId is replaced with your GitHub id. This is the repo
that you’ll be using for this assignment.
This is currently an empty repo. In the next step, we’ll clone this empty repo into a directory, either on your CSIL account, or on your local system.
Step 7: Cloning the repo
-
Login to your CSIL account, create a
~/cs156subdirectory, and change directory into itmkdir ~/cs156 cd ~/cs156(To be honest, you can actually use any directory you like; but we suggest this approach. We’ll refer to
~/cs156throughout the rest of the instructions for consistency. -
Now, go to the
github.comweb page, and find yourjpa00-useridrepo. The page should look something like this: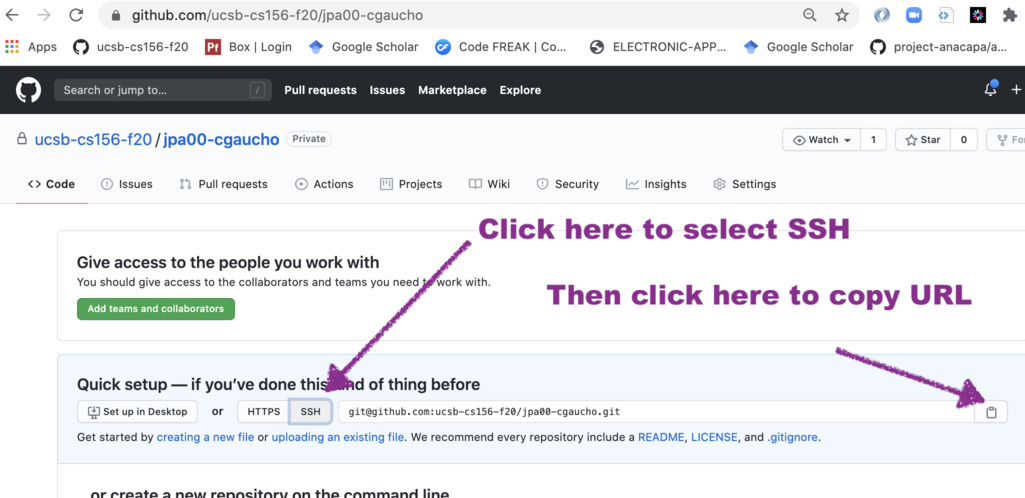
You should see a button for
SSH; select that button. Then there is a button to copy the URL shown; click that to copy the URL. -
Now type this command, replacing
urlwith the url that you copied.That
urlshould be something like git@github.com:ucsb-cs156-s21/jpa00-cgaucho.git but with your GitHub id in place of cgaucho.git clone urlYou’ll will see a warning message that you are cloning an empty repo; that’s normal.
Cloning into jpa00-cgaucho…
warning: You appear to have cloned an empty repository -
If you use the
lscommand, you should now have a subdirectory called jpa00-cgaucho (except cgaucho will be your GitHub username.) Use acdcommand to change directory into that directory, e.g.cd jpa00-cgaucho
An
ls -ashould reveal an empty directory except for the.gitsubdirectory indicating that this is a GitHub repo.% ls -a . .. .git %We are now ready to pull in some starter code.
Step 8: Locate the starter code.
First, let’s take a look at this remote on GitHub, here:
You should see that the README.md for this repo has an explanation of the contents of the starter code. Read though this explanation to learn more about:
- Maven
- the
pom.xml - the required directory structure
Next, we’ll add this starter code as a second remote for our repo.
Step 9: A remote for starter
If you’ve used git before, you
may be familiar with the command:
git pull origin master
The word origin in this case refers to a remote, that is a repo that lives somewhere out there on the network.
The word master refers to the default branch of the repo. The default branch of GitHub repos recently changed from master to main; we’ll be using main throughout this course.
If you type the following command, you’ll see that origin is defined as a remote for the repo that you cloned from. Your output will look similar, except that you’ll have your GitHub in place of cgaucho:
% git remote -v
origin git@github.com:ucsb-cs156-s21/jpa00-cgaucho.git (fetch)
origin git@github.com:ucsb-cs156-s21/jpa00-cgaucho.git (push)
%
Now, we are going to add a second remote. This remote will use the URL for the starter code.
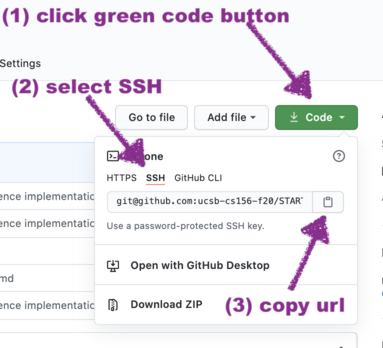
The image below shows how to copy that URL: (1) Click the green Code button. (2) Select SSH to choose that as the network protocol for the URL (3) Click the icon to copy the URL to your clipboard.
Then, use this command to add a remote called starter for the starter code repo:
git remote add starter paste-url-here
After this command, use git remote -v to list all your remotes. Your output should look like this (except your GitHub id in place of cgaucho):
% git remote -v
origin git@github.com:ucsb-cs156-s21/jpa00-cgaucho.git (fetch)
origin git@github.com:ucsb-cs156-s21/jpa00-cgaucho.git (push)
starter git@github.com:ucsb-cs156-s21/STARTER-jpa00.git (fetch)
starter git@github.com:ucsb-cs156-s21/STARTER-jpa00.git (push)
%
Step 10: Pull Starter Code into your Repo
The next step is to pull the starter code into your repo, and then push that code to your origin repo on GitHub.
Here are the three commands:
git checkout -b main
git pull starter main
git push origin main
After these three commands, go look at your repo on GitHub, i.e. the repo at this url (but substituting your GitHub id for cgaucho:)
You should see that instead of an empty repo, you now have a copy of the starter code.
The starter code should compile and run, and can even be submitted to Gradescope for a grade. Of course, it won’t be for full credit, but we can at least make sure that the mechanisms are working. So let’s give it a try.
Step 11: Compile and run the Starter code
To compile the starter code, return to a shell prompt in the directory where your cloned your repo. You should see, when you type ls, that
the file pom.xml is in the current directory. For best results, you should always run Maven from this directory.
To compile type mvn compile.
- If you see the message
The JAVA_HOME environment variable is not defined correctly...plus a few more lines of output, see this link for a fix. - Otherwise, you should see no error messages
- There may be warning about missing
resourcesandUTF-8 encoding, but you can safely ignore those for now. If you are curious, see the the section “Warnings you May be able to Ignore” on this page.
Then, type mvn package. You should see a lot of output, but somewhere in that output, something like this:
[INFO] Building jar: target/hello-1.0.0.jar
That indicates that you have built a .jar (or Java Archive) file. This file is a compressed archive of all of the compiled Java code from your program. You can run it with this command:
java -cp target/hello-1.0.0.jar Hello
You should see output like this:
% java -cp target/hello-1.0.0.jar Hello
This is the wrong output!
%
- Note: If you are working on CSIL and see this instead:
Error: A JNI error has occurred, please check your installation and try again
...
followed by many lines of additional output, then try this instead:
$JAVA_HOME/bin/java -cp target/hello-1.0.0.jar HelloThis assumes you’ve done the fix described here to define
JAVA_HOMEto point to Java 11.
The line This is the wrong output! is being produced by the line of code:
System.out.println("This is the wrong output!");
You should eventually change this line to produce the correct output. But, don’t do that just yet. Let’s first see what happens when you submit a program with errors in it to Gradescope.
Step 12: Submit incorrect Java code to Gradescope
In this step, we’ll see what happens when you submit two incorrect program to Gradescope. We aren’t grading this step, so you could skip it, but we strongly encourage you to do it anyway, because it’s important to be able to understand how the autograders work on a simple case before dealing with a more complex case.
First, we’ll submit the starter code “as is” to Gradescope. Gradescope will be expecting a program that produces, as it’s output Hello, World! (followed by a newline).
Instead, your code currently produces: This is the wrong output! followed by a newline.
We want to see what the Gradescope output looks like in that case.
To submit to Gradescope, navigate to: https://gradescope.com.
You should have an account invitation in your email. If you don’t, ask an instructor, TA or mentor for assistance.
To submit your work, you should be able to click on the GitHub link in Gradescope, and locate your repo. The first time you do this, it may take a while; be patient before giving up. If it still doesn’t work after a while, you can either (a) ask the staff for assistance, or submit a zip file as an alternative.
- For instructions on submitting a Zip file, see: Gradscope Zip Submission
After you submit, it will take some time for Gradescope to process your submission. Once it’s processsed, you should see output similar to this:
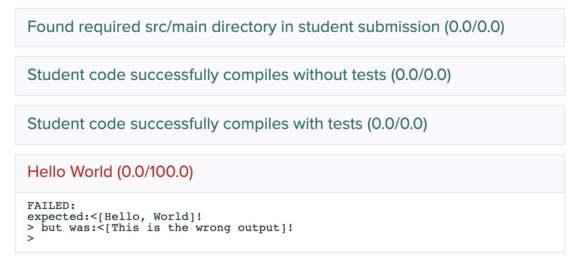
The most important part is this:
FAILED:
expected:<[Hello, World]!
> but was:<[This is the wrong output]!
>
Note that it tells you exactly what was different between the expected and actual output (the part in []). The ! is the same in both parts, so it is outside the [].
Once you’ve understood this output, let’s move on and see what happens when you submit code with a syntax error.
Go into the file src/main/java/Hello.java, and remove the semicolon at the end of the statement:
System.out.println("This is the wrong output!");
So that it reads:
System.out.println("This is the wrong output!")
This, of course, has a syntax error.
Try using mvn compile and see what happens when you submit this.
Then, commit this change to Github.
(Normally, we would NOT push code that has a syntax error, but for purposes of this experiment, we will.)
Add/Commit/Push with these commands:
git add src/main/java/Hello.java
git commit -m "commit code with syntax error to test autograder"
git push origin main
Now, submit to Gradescope again. You should see output like this:
-
At the right hand side, you’ll see the following:
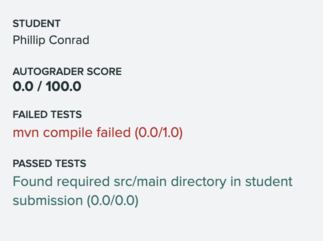
This is how you’ll know that the Maven compile failed on Gradescope.
But where can you see what went wrong? Read on:
-
Look in the main window, for output with
mvn compile failedat the top. It will probably be very long (the whole output is not shown):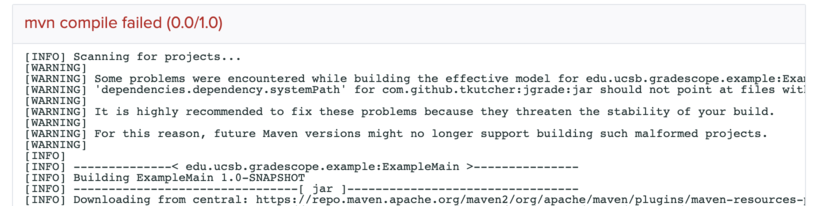
This output is really long because it shows every single file that was downloaded by Maven in order to do it’s work (which is quite a few). However, the really useful output is at the bottom, so you have to scroll down a while:
-
Look at the bottom of this section, and eventually you should see:
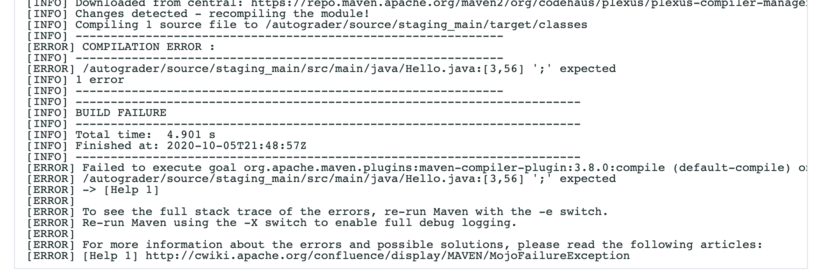
Here, finally, you can see what’s wrong with the compile (the missing semicolon).
Now that you understand what a failed compile looks like, let’s finally fix the code and finish the lab.
Step 13: Submit correct Java code to Gradescope
Now, fix the code so that it produces the correct output. Change the file src/main/java/Hello.java so that the System.out.println method call reads:
System.out.println("Hello, World!");
Test this locally by compiling and running the code:
mvn compile
mvn package
java -cp target/hello-1.0.0.jar Hello
You should see the correct output, Hello, World!.
Now, commit this change:
git add src/main/java/Hello.java
git commit -m "correct the output"
git push origin main
Then submit to Gradescope again.
Once you see that you have a score of 100 for jpa00 on Gradescope, you are done with jpa00.