Setting Up Legacy Code Projects
demo-spring-react-example (aka the Tech Stack MVP)
Before we start any new legacy code project on a given tech stack (including re-implementations of existing legacy code projects), we start by building a bare bones MVP application using the new tech stack. This serves as a way for staff to:
- validate that the tech stack is feasible for the legacy code projects in the class
- establish core infrastructure essential to every legacy code project
- This includes OAuth, database support, and testing / CI setup, for example.
- provide basic examples for getting started
- Basic user interface with a navbar
- Basic controllers that link to services and call external APIs
- Basic CRUD operations on a database table
If git history is preserved for legacy code repositories, this also serves as a place for course staff to resolve bugs / framework issues impacting all projects while in active development. When resolved, changes can be merged into legacy code project repositories.
Our current implementation of this proof-of-concept app using our current tech stack is demo-spring-react-example (abbreviated as dsre and formally known as “Kitchen Sink”).
This app also serves as the repository for which jpa03, the individual programming assignment about deploying and setting up OAuth web apps, is based on.
Starting a Project Codebase
When the time comes to create a new project repository, ensure that the project repository is public and empty (i.e. no initial template, README, gitignore, or license). This ensures that all students from current and previous quarters are able to see the app and allow us to use some features for free, such as GitHub Actions.
To copy the demo-spring-react-example application into the new repository with its commit history to establish a new project, we can run the following in a terminal:
git clone <new empty repository git url>
cd <name of empty repository>
git add remote starter git@github.com:ucsb-cs156/demo-spring-react-example.git
git pull starter main
git push origin main
Establishing Branch Protections
When a repository has been established, we must set up branch protections to prevent unauthorized pushes to the main branch. The main branch is designed to be in a clean, usable state at all times, and is what we refer to as “production” code. Because of this, we want to ensure that all changes merged into the main branch are reviewed by both the staff and the developing team to both ensure the quality of the code and allow students to learn professional code review practices in industry.
In order for any of these branch protections to work correctly, student teams must be assigned the “Write” permission in the repository. This is important!!! Any roles above this (i.e. “Maintain” and “Admin”) allow students to bypass and/or modify these protections.
Before setting up branch protections, let the Actions workflows run through at least once. Branch protections must also be set up within one week of the most recent Actions run.
To set up branch protections (using a JSON):
- Navigate to the project’s repository’s Settings page.
- Under “Code and automation”, click “Rules” and then “Rulesets”
-
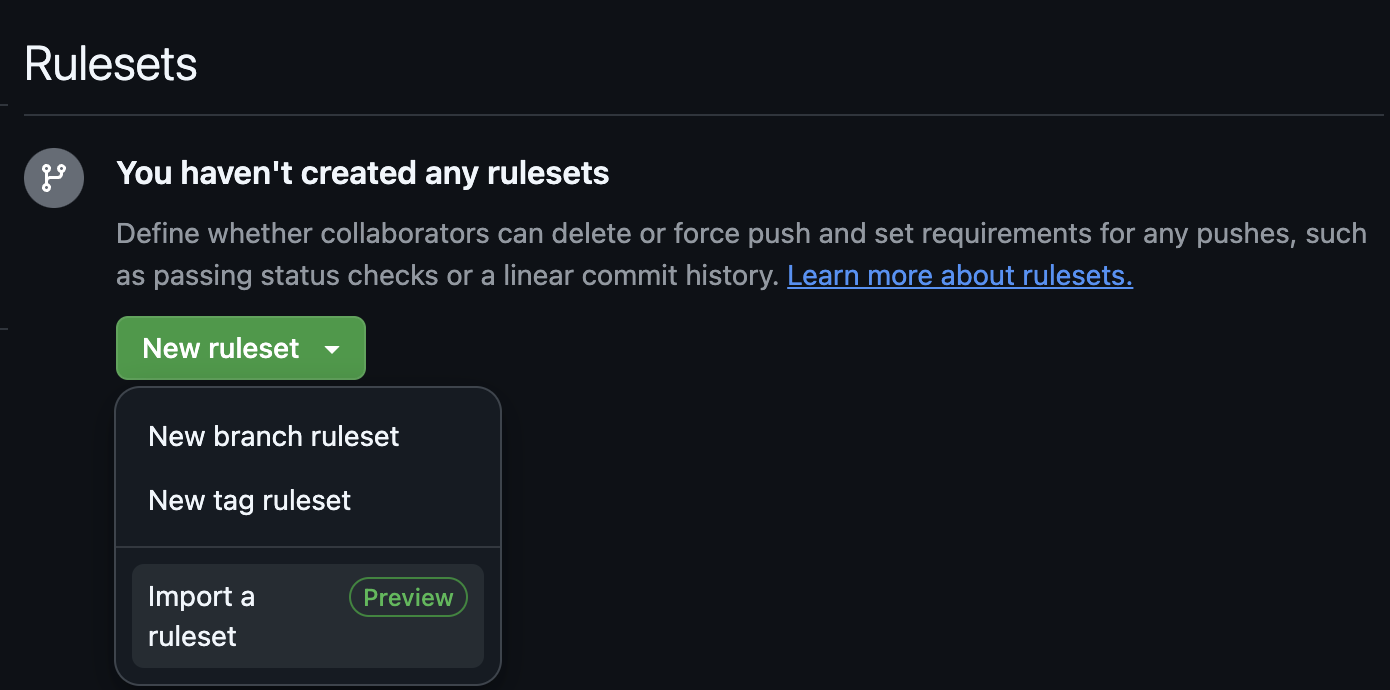
Click the green “New ruleset” button and “Import a ruleset”
- It will allow you to import a JSON file (make sure you have it downloaded and accessible locally from this repository: https://github.com/ucsb-cs156/rulesets/tree/main)
-
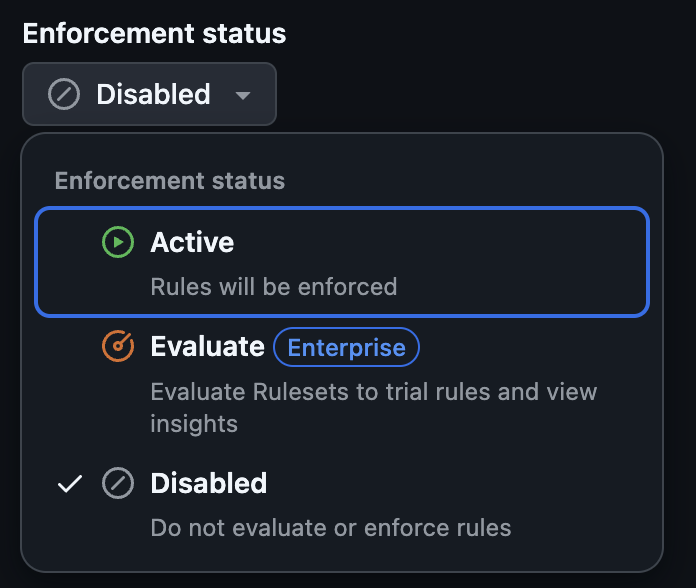
The JSON will populate the fields and after confirming that it was imported correctly you can make sure the protections are activated by setting the enforcement status to Active.
- At the bottom of the page, click ‘Save’ to set the branch predictions for the repository.
To set up branch protections (from scratch):
- Navigate to your project repository’s Settings page.
- On the left sidebar, under “Code and automation”, click “Rules” and then “Rulesets”.
-
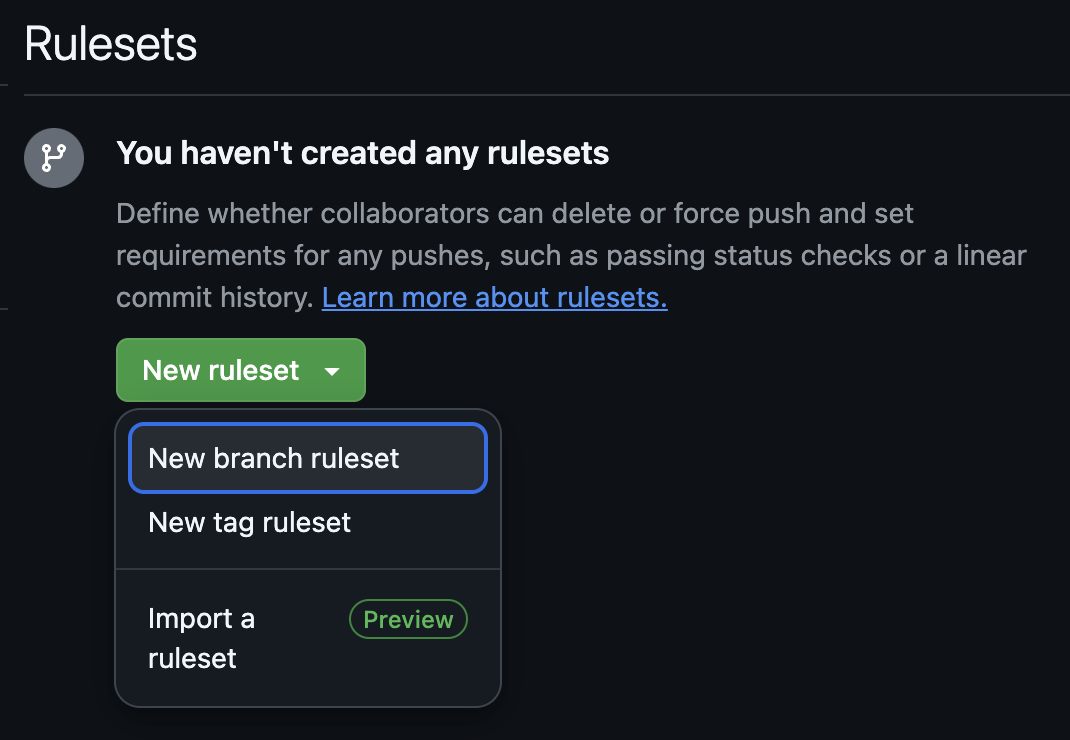
Click “New ruleset” and “New branch ruleset”.
- Set
main branch protectionsas the branch name pattern. This will apply these changes only to themainbranch and not any student branches. - Scroll down to the Rules and select “Restrict creations”, “Restrict updates”, and “Restrict deletions” for the Branch Rules.
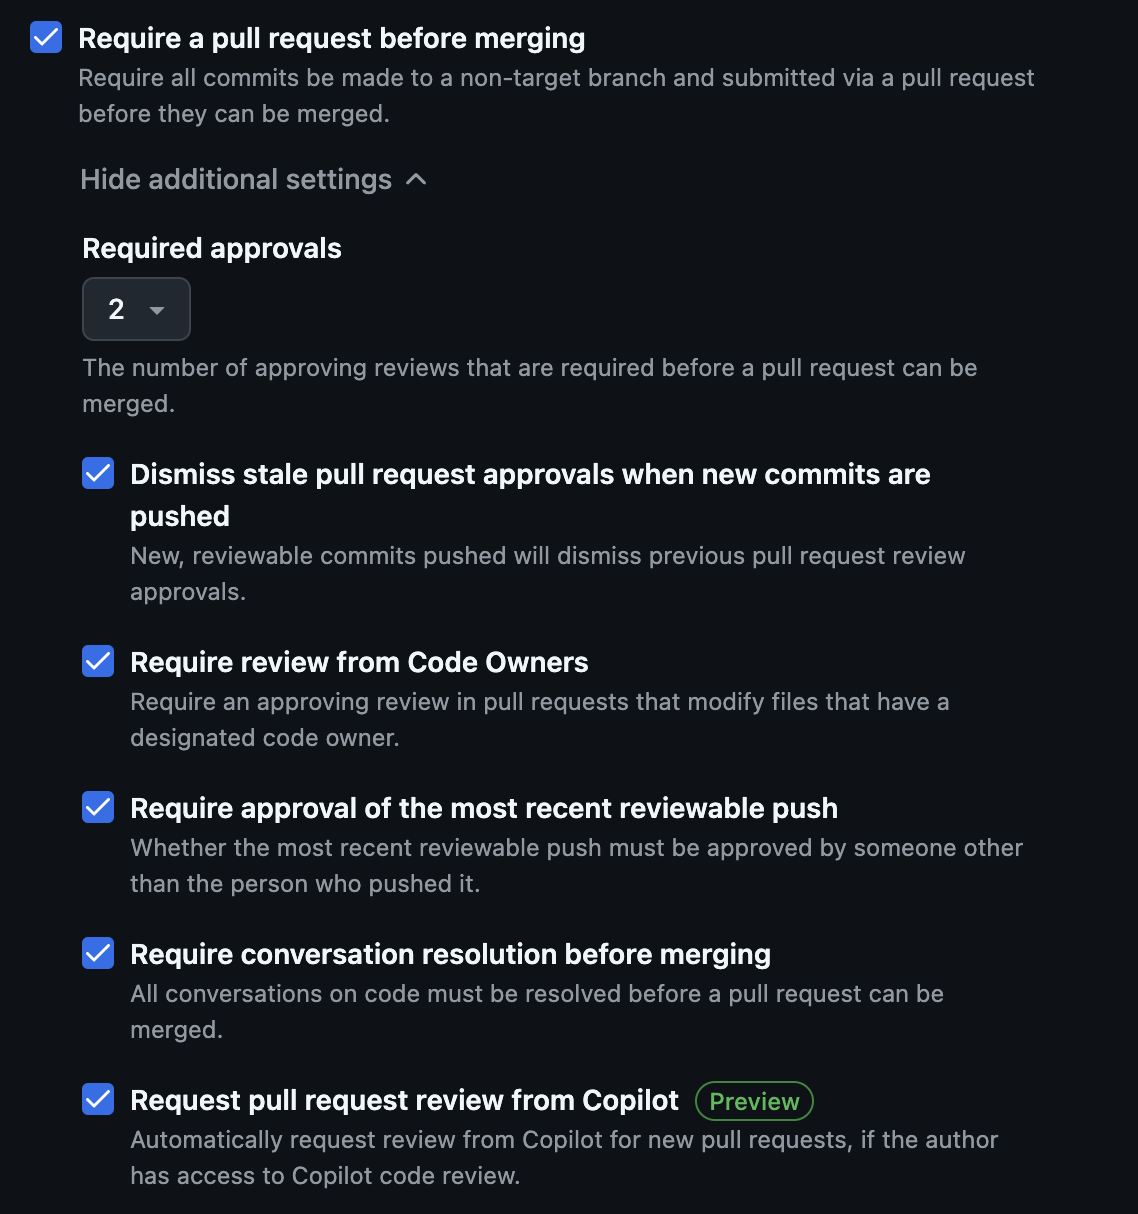
- Check “Require a pull request before merging”. In the new options that follow, select the following options:
- Check “Require approvals” and set the required number of approvals before merging to 2. This ensures that each legacy code pull request is reviewed at least once within the team and once by the staff.
- Check “Dismiss stale pull request approvals when new commits are pushed”. This ensures that any new changes made after an existing approval are properly reviewed.
-
We also want to make sure the staff/code owners have code reviewed before merging:
- Check “Require conversation resolution before merging”. This ensures that any conversations on code must be marked as “Resolved” before a merge can take place, ensuring that all feedback has been responded to.
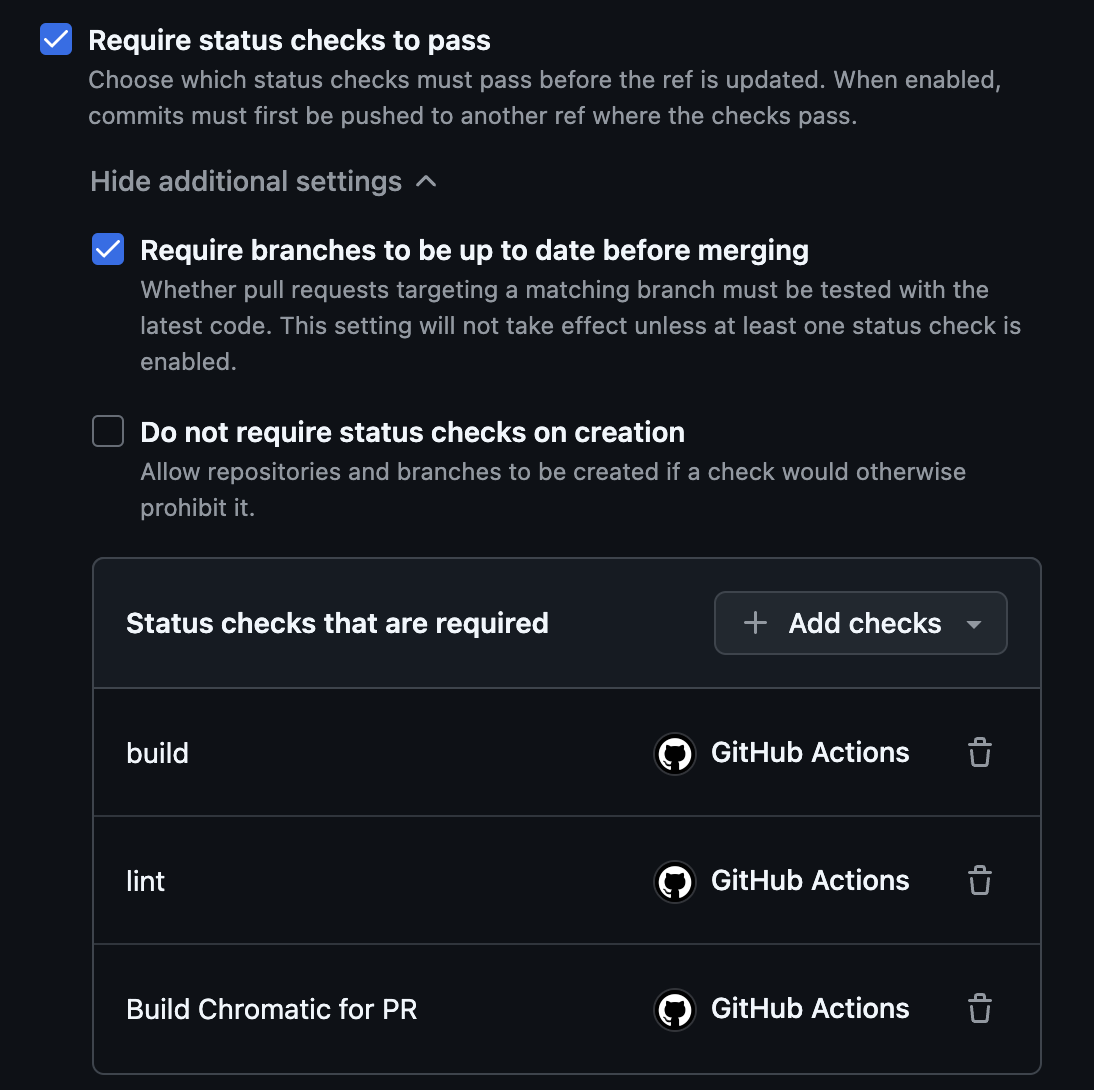
- Check “Require status checks to pass”. In the new options that follow, make the following changes:
- Check “Require branches to be up to date before merging”. This ensures that any new changes in the
main(destination) branch are present in the current branch and are compatible before merging. -
(Recommended) Mark the following status checks as required. These will prevent pull requests from being mergeable (without administrator approval) if the following checks don’t pass:
Status Check Corresponding Workflows build Java backend workflows (test, coverage, mutation) build (16.x) JavaScript frontend workflows (test, coverage, mutation) Build Chromatic for PR Chromatic and Storybook deployment workflows lint JavaScript ESLint workflow
- Check “Require branches to be up to date before merging”. This ensures that any new changes in the
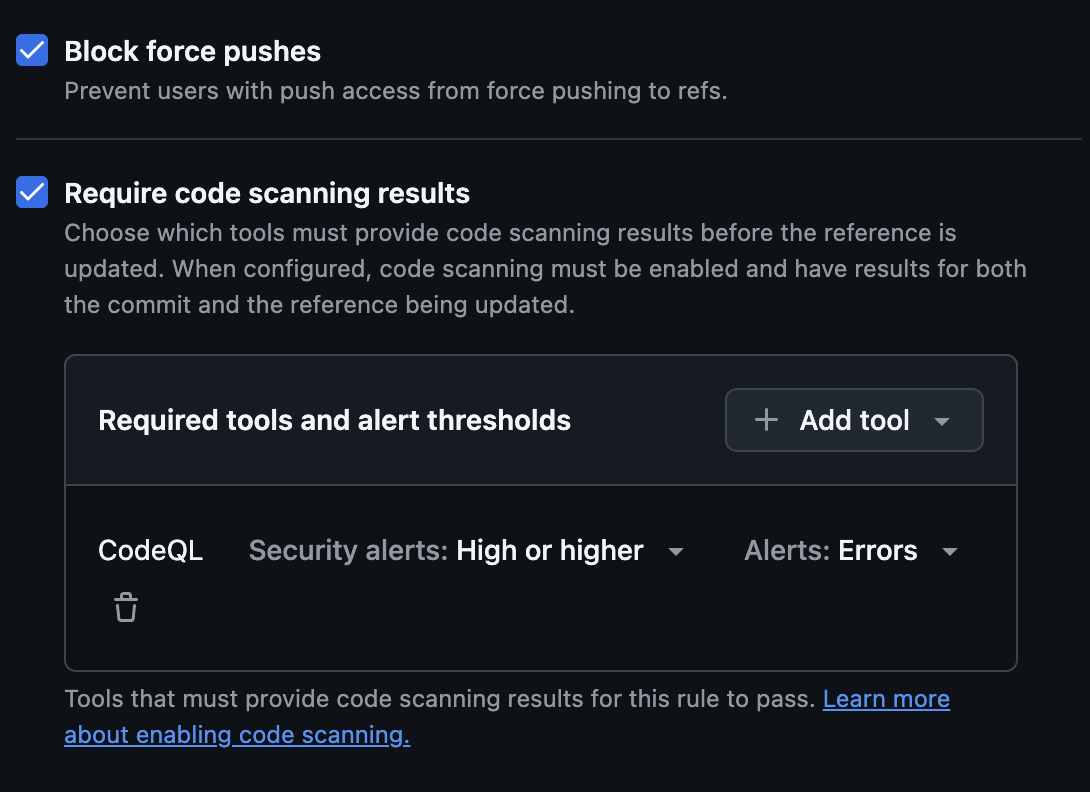
- Check “Block force pushes” and “Require code scanning results”. Under “Required tools and alert thresholds”, add the CodeQL tool for security alerts High or higher:
- Once the appropriate protections have been checked, click “Active” under “Enforcement status” at the top of the page.
- Create your branch protection rules by clicking “Save changes” on the bottom of the page.
